리니어 레이아웃(LinearLayout)과 상대 레이아웃(RelativeLayout)
이번시간에는 리니어 레이아웃과 상대 레이아웃에 대해 알아보겠습니다.
먼저 레이아웃의 전체적인 개요와 제약 레이아웃에 대해 알아보고 싶다면 아래 링크로 접속하시면 되겠습니다!
https://devdebin.tistory.com/138
제약 레이아웃(Constraint Layout)
레이아웃은 화면을 구성하는 뷰들을 배치하는 컨테이너로서 다양한 유형의 레이아웃을 제공한다. 아래와 같은 레이아웃들을 확인할 수 있다. 레이아웃 이름 설명 제약 레이아웃 (ConstraintLayout)
devdebin.tistory.com
1. 리니어 레이아웃
리니어 레이아웃은 뷰를 가로(Horizontal) 또는 세로(Vertical) 방향으로 일렬로 배치하는 레이아웃이다. 이에 대한 속성에 대해 알아보자.
채우기 : fill model (모든 뷰의 필수 속성)
뷰를 부모 뷰의 여유 공간에 어떻게 채울 것인지를 설정한다.
가로(폭) 크기 : layout_width
세로(높이) 크기 : layout_height
방향 : orientation
뷰의 배치 방향을 설정한다. (기본값은 가로 방향이다)
orientatiion 설정 값으로 방향을 바꿀 수 있다. (가로 < - > 세로)
정렬 (외부/내부) : layout_gravity, gravity
뷰의 정렬을 어떻게 할 것인지 설정(여유 공간 안에서 뷰를 정렬/뷰의 내용(텍스트)을 정렬)
여유 공간 (외부/내부) : layout_margin, padding
뷰의 여유 공간을 어떻게 할 것인지 설정
공간가중치 (분할) : layout_weight
뷰가 차지한 공간의 가중치 값을 설정 (남은 공간에 따라 뷰의 크기를 일정비율로 분배)
이제 layout_gravity를 사용한 간단한 예시를 살펴보겠다.
xml 코드는 아래와 같다.
<?xml version="1.0" encoding="utf-8"?>
<LinearLayout xmlns:android="http://schemas.android.com/apk/res/android"
    android:layout_width="match_parent"
    android:layout_height="match_parent"
    android:orientation="vertical"
   >

    <Button
        android:id="@+id/button"
        android:layout_width="wrap_content"
        android:layout_height="wrap_content"
        android:layout_gravity="left" 여기가 중요!!!!
        android:text="Left"
        android:textAllCaps="false"
        android:textSize="20sp"
        />

    <Button
        android:id="@+id/button2"
        android:layout_width="wrap_content"
        android:layout_height="wrap_content"
        android:layout_gravity="center"  여기가 중요!!!
        android:text="Center"
        android:textAllCaps="false"
        android:textSize="20sp"
        />

    <Button
        android:id="@+id/button3"
        android:layout_width="wrap_content"
        android:layout_height="wrap_content"
        android:layout_gravity="right"    여기가 중요!!!
        android:text="Right"
        android:textAllCaps="false"
        android:textSize="20sp"
        />
</LinearLayout>
공간 가중치 설정하기
- 공간 가중치는 부모 컨테이너에서 남아 있는 여유 공간을 여러 개의 뷰들에게 어떻게 분할 할 것인가를 비율로 지정한다.
- 공간 가중치란 뷰의 중요도를 의미하는 것으로 그 값의 비율만큼 뷰에게 여유 공간을 할당한다.
- 리니어 레이아웃과 가중치(weight) 속성을 사용하면 해상도에 상관없이 모든 단말에서 거의 동일한 레이아웃을 구현하는 기능이다.
- android:layout_weight 속성을 사용한다.
- 예를 들어 두 개의 뷰에 각각 1의 값을 공간 가중치로 지정하면, 두 개의 뷰는 각각 1/2씩 여유 공간을 가진다.
- 예를 들어 두 개의 뷰에 각각 1과 2로 지정하면, 두 개의 뷰는 각각 1/3과 2/3씩 여유 공간을 가진다.
아래는 가중치에 대한 실습 xml 코드다.
<?xml version="1.0" encoding="utf-8"?>
<LinearLayout xmlns:android="http://schemas.android.com/apk/res/android"
    android:layout_width="match_parent"
    android:layout_height="match_parent"
    android:orientation="vertical"
   >

    <LinearLayout
        android:layout_width="match_parent"
        android:layout_height="match_parent"
        android:orientation="vertical"
        android:layout_weight="1">


        <TextView
            android:layout_width="match_parent"
            android:layout_height="match_parent"
            android:text="TextView"
            android:layout_weight="1"
            android:background="#ff0000"/>

        <TextView
            android:layout_width="match_parent"
            android:layout_height="match_parent"
            android:text="TextView"
            android:layout_weight="1"
            android:background="#00ff00"/>

        <TextView
            android:layout_width="match_parent"
            android:layout_height="match_parent"
            android:text="TextView"
            android:layout_weight="1"
            android:background="#0000ff"/>

    </LinearLayout>

    <LinearLayout
        android:layout_width="match_parent"
        android:layout_height="match_parent"
        android:orientation="horizontal"
        android:layout_weight="1">

        <TextView
            android:layout_width="match_parent"
            android:layout_height="match_parent"
            android:text="TextView"
            android:layout_weight="1"
            android:background="#ff0000"/>

        <TextView
            android:layout_width="match_parent"
            android:layout_height="match_parent"
            android:text="TextView"
            android:layout_weight="1"
            android:background="#00ff00"/>

        <TextView
            android:layout_width="match_parent"
            android:layout_height="match_parent"
            android:text="TextView"
            android:layout_weight="1"
            android:background="#0000ff"/>

    </LinearLayout>
</LinearLayout>
이 코드는 아래와 같이 출력된다.

그럼 이제 내부에 있는 LinearLayout 2번째의 layout_width를 2로 바꾸어 보겠다. 그럼 결과는 아래와 같다.
가중치의 차이를 줘서 위의 실습결과와 비율의 차이를 확인할 수 있다.

2. 상대 레이아웃
상대 레이아웃은 다른 뷰나 부모 뷰와의 상대적인 위치를 이용해 뷰를 배치하는 방법이다.
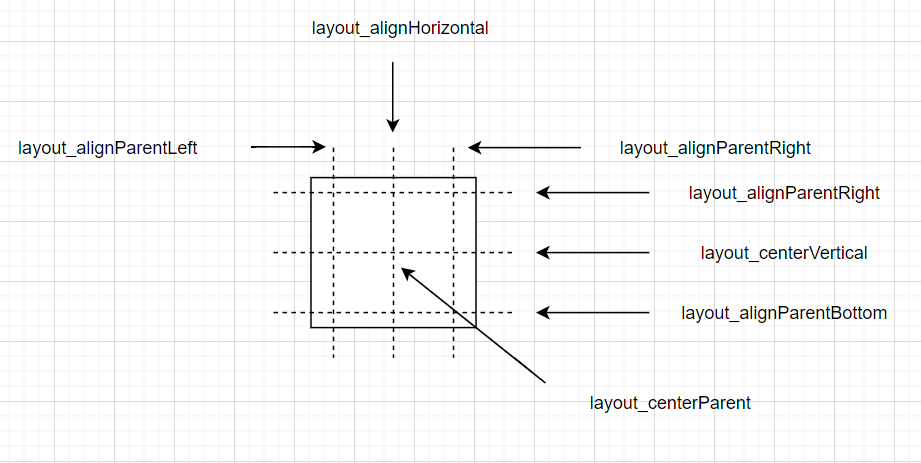
상대 레이아웃에서 부모 컨테이너와의 상대적 위치를 이용하는 속성이다.
| 속성 | 설명 |
| layout_alignParentTop | 부모 컨테이너의 위쪽과 뷰의 위쪽을 맞춘다 |
| layout_alignParentBottom | 부모 컨테이너의 아래쪽과 뷰의 아래쪽을 맞춘다 |
| layout_alignParentLeft | 부모 컨테이너의 왼쪽 끝과 뷰의 왼쪽 끝을 맞춘다 |
| layout_alignParentRight | 부모 컨테이너의 오른쪽 끝과 뷰의 오른쪽 끝을 맞춘다 |
| layout_centerHorizontal | 부모 컨테이너의 수평 방향 중앙에 배치한다. |
| layout_centerVertical | 부모 컨테이너의 수직 방향 중앙에 배치한다 |
| layout_centerInParent | 부모 컨테이너의 수평과 수직 방향 중앙에 배치한다 |
상대 레이아웃에서 다른 뷰와의 상대적 위치를 이용하는 속성이다.
| 속성 | 설명 |
| layout_above | 지정한 뷰의 위쪽에 배치한다. |
| layout_below | 지정한 뷰의 아래쪽에 배치한다. |
| layout_toLeftOf | 지정한 뷰의 왼쪽에 배치한다. |
| layout_toRightOf | 지정한 뷰의 오른쪽에 배치한다. |
| layout_alignTop | 지정한 뷰의 위쪽과 맞춘다. |
| layout_alignBottom | 지정한 뷰의 아래쪽과 맞춘다. |
| layout_alignLeft | 지정한 뷰의 왼쪽과 맞춘다. |
| layout_alignRight | 지정한 뷰의 오른쪽과 맞춘다. |
| layout_alignBaseline | 지정한 뷰와 내용물의 아래쪽 기준선을 맞춘다 |

아래는 레이아웃 실습 xml 코드다.
<?xml version="1.0" encoding="utf-8"?>
<RelativeLayout xmlns:android="http://schemas.android.com/apk/res/android"
    android:layout_width="match_parent"
    android:layout_height="match_parent"
   >
    <Button
        android:id="@+id/baseBtn"
        android:layout_width="150dp"
        android:layout_height="150dp"
        android:text="기준 위젯"
        android:layout_centerHorizontal="true"
        android:layout_centerVertical="true"
        />
    <Button
        android:id="@+id/button1"
        android:layout_width="wrap_content"
        android:layout_height="wrap_content"
        android:layout_alignTop="@id/baseBtn"
        android:layout_toLeftOf="@id/baseBtn"
        android:text="1번"
        />
    <Button
        android:id="@+id/button2"
        android:layout_width="wrap_content"
        android:layout_height="wrap_content"
        android:layout_alignBaseline="@id/baseBtn"
        android:layout_toLeftOf="@id/baseBtn"
        android:text="2번"
        />
    <Button
        android:id="@+id/button3"
        android:layout_width="wrap_content"
        android:layout_height="wrap_content"
        android:layout_alignBottom="@id/baseBtn"
        android:layout_toLeftOf="@id/baseBtn"
        android:text="3번"
        />
    <Button
        android:id="@+id/button5"
        android:layout_width="wrap_content"
        android:layout_height="wrap_content"
        android:layout_alignRight="@id/baseBtn"
        android:layout_below="@id/baseBtn"
        android:text="5번"
        />
    <Button
        android:id="@+id/button6"
        android:layout_width="wrap_content"
        android:layout_height="wrap_content"
        android:layout_toRightOf="@id/baseBtn"
        android:layout_above="@id/baseBtn"
        android:text="6번"
        />
    <Button
        android:id="@+id/button4"
        android:layout_width="wrap_content"
        android:layout_height="wrap_content"
        android:layout_alignLeft="@id/baseBtn"
        android:layout_above="@id/baseBtn"
        android:text="4번"
        />
</RelativeLayout>
결과물은 아래와 같다.

아래는 다른 예시다.
<?xml version="1.0" encoding="utf-8"?>
<RelativeLayout xmlns:android="http://schemas.android.com/apk/res/android"
    android:layout_width="match_parent"
    android:layout_height="match_parent"
   >
    <Button
        android:id="@+id/button"
        android:layout_width="wrap_content"
        android:layout_height="wrap_content"
        android:layout_alignParentTop="true"
        android:layout_centerHorizontal="true"
        android:text="위 쪽"
        />
    <Button
        android:id="@+id/button2"
        android:layout_width="wrap_content"
        android:layout_height="wrap_content"
        android:layout_alignParentLeft="true"
        android:layout_centerVertical="true"
        android:text="좌측"
        />
    <Button
        android:id="@+id/button3"
        android:layout_width="wrap_content"
        android:layout_height="wrap_content"
        android:layout_centerInParent="true"
        android:text="중앙"
        />
    <Button
        android:id="@+id/button4"
        android:layout_width="wrap_content"
        android:layout_height="wrap_content"
        android:layout_alignParentRight="true"
        android:layout_centerVertical="true"
        android:text="우측"
        />
    <Button
        android:id="@+id/button5"
        android:layout_width="wrap_content"
        android:layout_height="wrap_content"
        android:layout_alignParentBottom="true"
        android:layout_centerHorizontal="true"
        android:text="아래"
        />
</RelativeLayout>
결과물은 아래 이미지와 같다.

이상으로 리니어 레이아웃과 상대 레이아웃 복습 포스팅을 마치겠습니다. 감사합니다.